怎样利用PHP+Mysql实现基本的增删改查功能?(实例详解)
本篇文章我们来看一下怎样利用mysql来实现简单的增、删、改、查的功能,其中需要创建多个页面对数据库的数据进行处理,希望对大家有帮助!

PHP是一种在服务器端执行的嵌入HTML文档的面向对象、解释型的脚本语言,语言风格类似于c语言。它具有强大的功能,能实现所有的CGI(公共网关接口,服务器与客户端程序进行“交谈”的一种工具)的功能,并比一般CGI有更快的执行速度。
创建数据库
因为要连接Mysql数据库,所以这里我们就先建一个名叫db_user的数据库
--创建数据库db_user
create database db_user;
--指定当前数据库为db_user
use db_user;
--用户信息表users
create table users
(
user_id int not null auto_increament primary key,
user_name char(10) not null,
user_psw char(10) not null,
user_sex char(1) not null,
user_age int null,
user_dept int not null,
user_group int not null
);
--部门表dept
create table dept
(
dept_id int not null auto_increment primary key,
dept_name char(20) not null,
dept_leader char(10) not null,
dept_location char(50) not null
);
--用户组表usergroup
create table usergroup
(
group_id int not null auto_increment primary key,
group_name char(20) not null,
group_desc char(50) not null
);
--权限表func
create table func
(
func_id int not null auto_increment primary key,
func_name char(20) not null,
func_link char(20) not null
);
--用户组权限表groupfunc
create table groupfunc
(
id int not null auto_increment primary key,
group_id int not null,
func_id int not null
);
--插入一条测试数据
insert into db_user.users(`user_id`, `user_name`, `user_psw`, `user_sex`, `user_age`, `user_dept`, `user_group`) values (2, '隔壁老王', '2396', '男', 33, 0, 1);
系统实现
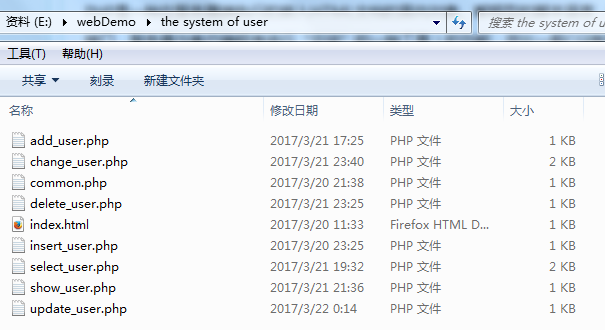
所有页面文件列表如下:

接下来,就一步一步讲解各个页面文件的功能与实现 。
1.主页面
创建系统的主页面文件index.html,实现代码如下:
<html>
<head>
    <title>一个简单用户管理系统实例</title>
</head>
<body>
    <h2>用户管理系统</h2>
    <h3>用户管理</h3>
    <a href="add_user.php">添加用户</a><br/>
    <a href="show_user.php">查看用户</a>
    <h3>部门管理</h3>
    <a href="add_dept.php">添加部门</a><br/>
    <a href="show_dept.php">查看部门</a>
    <h3>用户组管理</h3>
    <a href="add_usergroup.php">添加用户组</a><br/>
    <a href="show_usergroup.php">查看用户组</a>
    <h3>权限管理</h3>
    <a href="add_fun.php">添加权限</a><br/>
    <a href="show_fun.php">查看权限</a>
</body>
</html>
效果:

2.公共代码模块
新建common.php文件,代码如下,用以连接数据库服务器,这里我们把连接数据库的操作封装成一个公共代码模块,在下面各页面文件中通过<?php require_once "common.php";?> 引入,这样就不用重复编写连接代码了。
<?php
$con=mysql_connect("localhost:3306","root","642765") or die("数据库服务器连接失败!<br>");
mysql_select_db("db_user",$con) or die("数据库选择失败!<br>");
mysql_query("set names 'gbk'");//设置中文字符集
?>
在PHP中,可以使用下面两种函数来建立与Mysql数据库服务器的连接,
mysql_connect():建立非持久连接
mysql_pconnect():建立持久连接
此处建立的是非持久连接。
3.各页面的设计与实现
添加用户
添加用户的web页面文件add_user.php的实现代码如下:
<?php require_once "common.php";?>
<html>
<head>
<title>添加用户</title>
</head>
<body>
<h3>添加用户</h3>
<form id="add_user" name="add_user" method="post" action="insert_user.php">
用户姓名:<input type="text" name="user_name"/><br/>
用户口令:<input type="text" name="user_psw"/><br/>
用户性别:<input type="text" name="user_sex"/><br/>
用户年龄:<input type="text" name="user_age"/><br/>
所属部门:<select name="show_user_name">
<?php
$sql="select * from dept";
$result=mysql_query($sql,$con);
while($rows=mysql_fetch_row($result)){
    echo "<option value=".$rows[0].">".$rows[1]."</option>";
}
?>
</select><br/>
用户组名:<select name="user_group">
    <?php
    $sql="select * from usergroup";
    $result=mysql_query($sql,$con);
    while($rows=mysql_fetch_row($result)){
        echo "<option value=".$rows[0].">".$rows[1]."</option>";
    }
    ?>
    </select><br/>
    <br/>
<input type="submit" value="添加"/>
</form>
</body>
</html>
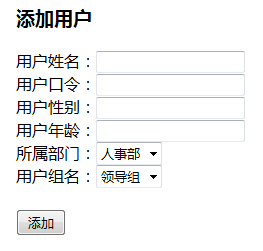
然后,将程序部署在已开启的wamp平台环境中,并在浏览器中输入“http://localhost:端口号/文件路径”,即可查看效果。大家从网址可能已经发现我的端口号为8080,这是我自定义的,默认的端口号是80(这时就可以不用写端口号,直接localhost)。
效果:

当添加成功后,页面会自动跳转到下面的web页面

查看用户
查看用户的web页面文件show_user.php的实现代码如下,可以通过指定用户姓名或用户所属部门来查看该用户的全部个人信息。
<?php require_once "common.php";?>
<html>
<head><title>查看用户</title>
</head>
<body>
<h3>查看用户</h3>
<form id="show_user" name="show_user" method="post" action="select_user.php">
用户姓名:<input type="text" name="show_user_name"/><br/>
所属部门:<select name="show_user_dept">
<option value=0>所有部门</option>
<?php
$sql="select * from dept";
$result=mysql_query($sql,$con);
while($rows=mysql_fetch_row($result)){
    echo "<option value=".$rows[0].">".$rows[1]."</option>";
}
?>
</select><br/>
<br/>
<input type="submit" value="查看"/>
</form>
</body>
</html>
效果:

点击查看按钮,即会跳转到下面页面

从图中可以看出,在该用户的查看结果页面中包含了执行修改该用户和删除该用户操作的超链接入口,分别对应着change_user.php和delete_user.php文件。
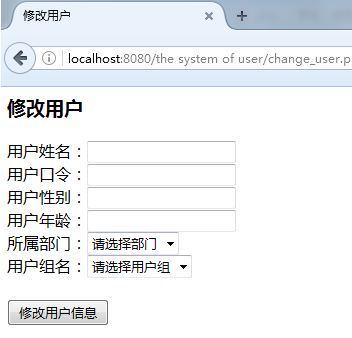
修改用户
修改用户的web页面文件change_user.php的实现代码如下:
<?php require_once "common.php";?>
<html>
<head><title>修改用户</title>
</head>
<body>
    <h3>修改用户</h3>
    <form id="add_user" name="add_user" method="post" action="update_user.php?user_id=
        <?php echo trim($_GET['user_id']);?>" >
    用户姓名:<input type="text" name="user_name"/><br/>
    用户口令:<input type="text" name="user_psw"/><br/>
    用户性别:<input type="text" name="user_sex"/><br/>
    用户年龄:<input type="text" name="user_age"/><br/>
    所属部门:<select name="user_dept">
    <option value=0>请选择部门</option>
    <?php
    $sql="select * from dept";
    $result=mysql_query($sql,$con);
    while($rows=mysql_fetch_row($result)){
        echo "<option value=".$rows[0].">".$rows[1]."</option>";
    }
    ?>
    </select><br/>
用户组名:<select name="user_group">
    <option value=0>请选择用户组</option>
    <?php
    $sql="select * from usergroup";
    $result=mysql_query($sql,$con);
    while($rows=mysql_fetch_row($result)) {
        echo "<option value=".$row[0].">".$rows[1]."</option>";
    }
    ?>
    </select><br/>
<br/>
<input type="submit" value="修改用户信息"/>
</form>
</body>
</html>
当在上面页面中输入完新的用户信息后,点击按钮,即可调用应用层中用于执行修改用户操作的业务逻辑处理代码update_user.php,该代码内容如下:
<?php require_once "common.php";
$user_id=trim($_GET['user_id']);
$user_name=trim($_POST['user_name']);
$user_psw=trim($_POST['user_psw']);
$user_sex=trim($_POST['user_sex']);
$user_age=trim($_POST['user_age']);
$user_dept=trim($_POST['user_dept']);
$user_group=trim($_POST['user_group']);
$sql="UPDATE users SET user_name='".$user_name."',user_psw='".$user_psw."',user_sex='".$user_sex."',user_age='".$user_age."',user_dept='".$user_dept."',user_group='".$user_group."'  WHERE user_id=";
$sql=$sql.$user_id;
if(mysql_query($sql,$con))
    echo "用户修改成功!<br>";
else
    echo "用户修改失败!<br>";
?>
删除用户
在用户查看结果页面中,有个删除用户的超链接,点击即可调用下面的逻辑处理代码delete_user.php,从而实现对当前用户的删除。
<?php require_once "common.php";?>
<html>
<head><title>删除用户</title>
</head>
<body>
    <?php
    $user_id=trim($_GET['user_id']);
    $sql="DELETE FROM users WHERE user_id=";
    $sql=$sql.$user_id;
    if(mysql_query($sql,$con))
        echo "用户删除成功!<br>";
    else
        echo "用户删除失败!<br>";
    ?>
</body>
</html>
当删除成功后,会跳转到下面页面

本文网址:https://www.zztuku.com/detail-10469.html
站长图库 - 怎样利用PHP+Mysql实现基本的增删改查功能?(实例详解)
申明:本文转载于《CSDN》,如有侵犯,请 联系我们 删除。


您还没有登录,请 登录 后发表评论!
提示:请勿发布广告垃圾评论,否则封号处理!!